Pages

Saturday, July 31, 2010

Helping Hudson …. A Wheely Good Cause.

Who is Hudson and what is the cause?
Hudson is a 2 1/2 year old boy. Before he was born, at 27 weeks of preganacy he was diagnosed with Agenesis of the Corpus Callosum, which basically means the central part of his brain connecting the two halves is underdeveloped.He has a condition called Optic Nerve Hypoplasia with Nystagmus. This is a damage to the optic nerve, which means his brain finds it difficult to interpret what he sees.He is also diagnosed with Cerebral Palsy and Epilepsy.He is on medication and receives extensive physiotherapy.Hudson is unable to make his body do what he wants it to do. His family and friends wish to see the smile on his face when he makes his first move on his own. A special wheelchair for him called Kid Walker will help him take his first steps. It costs $5000/- So a group of Stampin' Up! demonstrators  touched by Hudson's story joined to help.


The Helping Hudson team are a group of Stampin' Up! ® demonstrators. Being a part of Stampin’ Up! is so much more than just cardstock, ribbon, inks and stamps ... friendships and camaraderie develop when groups of like minded women get together.Through discussions we came to see that a KidWalker would make such a difference to this little boy’s development and help him progress another step on the road towards independence, and together we decided to work on a project to help raise the funds.

So the team set up a website. Here is the link to the website: http://helpinghudson.blogspot.com/ Its a website to set up for some stamping challenges, tutorials to raise money for Hudson's Kid Walker.You can read more about Hudson here. Its a three week bonanza of challenges and stamping fun. There are bundles of tutorials catagorised under different themes. 

You can help Hudson by buying the tutorials and participating in the challenges.There are 6 tutorial bundles with 10 tutorials in each bundle and cost just $10 AUD each bundle. Which equates to just $1 AUD per tutorial. If you buy 4 or more tutorials you get a technique tutorial bundle free. So hop on to the website tomorrow and you will be sure you can find a tutorial bundle that you like. And participate in challenges and have fun and enjoy the prizes from Stampin' Up!

Spread the word by grabbing button from "Spread the Word" page and putting it on your blog and get the word to as many of friends and family as you can.Let’s get together to show our support for this lovely little boy. Together we crafty ladies can help him see the world from a different angle. Let’s all pitch in to get Hudson on the move.
 

I started making.....

Christmas tags and cards! This is the first time I am making them so early! But thinking of the number of tags and cards I need to make, I better start now! Here are the tags.


Supplies:
Cardstock: SU's Kiwi Kiss, Kraft and PTI's Stamper's Select White.
Stamp Sets: PTI's Stocking Prints, Mega Mixed Messages and Fancy Flourishes
Inkpads: SU's Real Red , Whisper White and Basic Black
Accessories: SU's eyelets, Spellbinder's label one dies and PTI's Matstack die

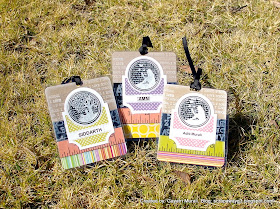
And I made three school tags. One each for my kids and one for my DD Aditi's friend's birthday. These tags, I CASEd from Heather Nichols. You can find it here. Here is mine. I have changed the colors a little and not added the heart shape with button.


I wanted these tags to be waterproof  because I like them so much and don't want them to be destroyed  during rainy days. So I laminated them, then punched the hole and added the ribbon. My kids loved them. They will wear their bags proudly to school on Monday! lol! Thanks Heather for sharing your school tags, they are just gorgeous.
I have been busy making some 60 bookmarks for school library. Will share them with you tomorrow. I also have couple of birthday gifts to make which I will share on Monday.
Thanks for stopping by! Have a great weekend.
Cheers!

Friday, July 30, 2010

Three in one!

I have another set of note cards today to share. I have made them for 3 challenges. My goodies from PTI had arrived and had a play with it yesterday. I came up with note cards for Susan's Challenge (Simplicity Blog) and then realised Ted's challenge is also similar this week and the sentiment on this card was perfect for the challenge at "A Passion for Papertrey" blog. So here is my notecards.

Here are the links to all the challenges, if you like to participate in them.

Supplies:
Cardstock: SU's Basic Black 
Stamps: PTI's All Booked Up and School Time
Inkpads: SU's Whisper White and Versamark

Simple and Clean one layer card set. Now I have made a storage for these cards today! I have a template for a purse which I think will fit these cards. Ok, off I go and print it out. Will share the purse when I complete it.

I wanted to let you all know that I have a few of my cards up for sale. Will be adding more as this weekend. You can see them on the "For Sale" page on the menu on the top on my blog. 
Thanks for stopping by
Cheers!

Wednesday, July 28, 2010

Note cards

 Sometime ago I made a cute little purse. Here it is. I wanted to know if  3 x 3 notecards will fit the purse? So I made a set of 3 note cards using this week's Fall to Layout #100. 
Here is the sketch for you.
 

And here are my note cards using this sketch.
 

Here is the entire set - the little purse and the set of 3 cards!


They all fit so beautifully inside the purse, isn't it cute?


Supplies:
 
Cardstock: PTI's Berry Sorbet and SU's Chocolate Chip
Stamp set: Clean and Simple Game On and PTI's Daily Design Senitment.
Inkpads: SU's Basic Black
Accessories: SU's Chocolate Chip taffeta ribbon, Kaisercraft rhinestones and Martha Stewart's border punch.

Thank you for stopping by!
Cheers!

Monday, July 26, 2010

The Play Date Cafe Challenge #39

I have a card today I made using the colors from the Play Date Cafe Challenge #39. Here is the inspirational photo and the colors.
 
 
Here is my take on the colors.
 
 A trifold card made using SU's Manhattan Flower Embossing folder.


Supplies:
Cardstocks: SU's Kraft, Basic Gray and Basic Black
DSP: Basic Grey white paper
Stamp set: SU's Fifth Floral Avenue and PTI's Birthday Basics
Inkpads: SU's Going Gray and Tim Holtz's Frayed Burlap
Accessories: PTI's True Black satin ribbon, SU's Vellum paper, Martha Stewart border punch, SU's Kraft ribbon. PTI's True Black button and corner punch.

Thanks for the color challenge and also stopping by! 
Cheers!


PTI July Blog Hop

Morning everybody,
Its 5AM here but I am probably fast asleep still. Thank goodness, posts on the blog can be scheduled. So this is a scheduled post. July PTI Blog Hop is all about using Office Supplies.


For this month's Blog Hop we are focusing on office supplies!  We want to see you incorporate all of
those fun desk drawer fillers into your paper crafting projects.  This can include paper clips, binder clips,
rubber bands, file folders, staples, binder rings, adhesive labels, post-it notes, index cards or whatever
else you can dream up.  Reinvent these basic office staples to be hip and trendy additions to your
projects!  We look forward to seeing your creations!
 
 Here is my project for the July Bloghop. Its a Stationary gift set.
 
 
The set contains a note pad, post it note, a box of paperclips and a address book printed off the computer.
 
 
 I have used "From the Desk of"  template from My Time made Easy and decorated it using Green Boutique Pattern paper from PTI.


I was a little bummed by what to do with this month's theme. And I was so busy that I did not give so much thought to it. After completing this project, there are a lot of ideas coming to my mind. Sigh!  I like this set , just not innovative use of the theme, I think! Thanks for stopping by!
Now all excited to see everybody's inspirational projects.
Cheers!

Friday, July 23, 2010

JAI #27 meets Colorthrow #102

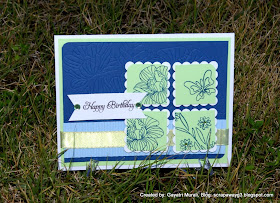
Just Add Ink challenge #27 is a sketch challenge. I love this sketch because of the group of squares. They are great to show off different techniques on it or just add pattern paper or cut a photo into 4 squares.... I have decided to just stamp images on the squares. I needed  a color combination for it. So I am using the Colorthrow challenge #102 combination. Here is the sketch and the color combination for you.


Here is my take on both the challenge.
We, in Australia haven't yet got our new colors. Got to wait for another month.So I am using Green Galore for Wild Wasabi and Bashful Blue for Marina Mist.
Supplies:
Cardstock: PTI's Stamper's Select White, SU's Not quite navy, Green Galore and Bashful Blue.
Stamp set: PTI's In Bloom, Delightful Dahila and Flutterby Friends
Accessories: In Bloom impression plate from PTI, SU's Crimper, PTI's Spring Moss satin ribbon, SU's scallop square punch, square punch and Kaisercraft green rhinestones.
Thanks for stopping by! Hope you like it.
Have a great weekend!
Cheers!

Wednesday, July 21, 2010

Thinking of you....

I think I have missed about 3 sketches from 2S4Y blog. They are beautiful sketches and I plan to use them in the near future. I had the time to do this week's sketch though. This is 2S4Y sketch #57.
 

This is my interpretation of the sketch.


Challenge: 2S4Y sketch #57

Supplies:
Cardstock: PTI's Kraft and SU's Confetti white.
DSP: Basic Grey's Green at heart paperpad.
Stamp set; PTI's Lilly of the Valley
Inkpads: SU's Basic Black and Colorbox rustic colors.
Accessories: Kaisercraft's and Fancy Pants's rubons, Prima Marketing's pearl flourish and rose flowers, Fiskar's border punch and Heid Swapp's edge distressor.

I made two cards yesterday. One was a clean and simple card and this one which is totally a different style.  A lot of embellishments and colors. Just trying to experiment the various styles to see which is my style!!! I am not sure yet because there are a few more to try. There is classy and elegant, shabby chic, vintage and modern and funky. Anyway, I think its going to take time to figure out what my style is. Thanks for another lovely sketch. Have a great day!
Hugs

Tuesday, July 20, 2010

Butterfly Pansies...

Second post today! As I told you my Daughter Aditi is sick and at home, she is bored!!! She asked me if she can do some crafts with me. So we browsed through the internet and then set to make the butterfly pansies. There are different ways to make it. But this is how we made it. I decided to make a tutorial to show how to make them in about 3 minutes. Its super duper easy.


Punch out two butterflies out of white cardstock using SU's butterfly punch

 
I then sponged the centre of the butterfly with SU's Summer Sun ink. You can use any bright yellow ink.


Next, I sponged the butterfly with SU's Bravo Burgundy ink
 

Finally, I sponged Elegant Eggplant to get the darker purplish shade.


Use the crimper and crinkle both the butterflies.
 

Layer one butterfly over the other. One vertically and the other horizontally.


Don't they look like pansies ? I added a purple rhinestone in the centre of the pansies to make it look pretty.
 

You can use it for your cards or scrapbook page as it is. I stuck these pansies on hair clips and here they are...
 

...On my DD's hair!


I have added SU's Dazzling Diamonds around the rhinestones for some sparkle... Hope you enjoyed the tutorial. Have fun making them yourself.
Cheers!

Clean and Simple meets JAI Embossing!

Well, school started today but only one of my children went to school today. My DD Aditi is sick with cold and flu and is at home with me. The viruses seems to get attracted to her a lot more now-a-days. Pretty girl you see! She is reading as I type and rolls her watery eyes lol! Anyway, since I am stuck at home, I decided to craft. Here is a card I made using Clean and Simple sketch and since I embossed the images, I am entering the card for JAI - Embossing challenge as well.
CAS sketch for you.
 

Here is my take on the challenges


Challenges: CAS Sketch and JAI- Embossing

Supplies:
Cardstock: PTI's Kraft, Melon Berry and Hawaiian Shores
Stamp set: Kind and Caring Thoughts from SU
Ink: White craft ink from SU
Accessories: Note punch from SU, White embossing powder from SU, PTI's Black satin ribbon,PTI's melon Berry button, Sponge and corner punch from SU.

Always nice to do a basic technique on a simple card. The focus is great on the image and sentiment.
Thanks for these beautiful challenges week after week. Its always exciting to see a new CAS sketch or whats new this week at JAI. Have a great week!
Hugs

Monday, July 19, 2010

PDCC #38

Today I have a picnic basket I made using the colors from The Play Date Cafe Color Challenge #38. 
Here are the colors of the challenge.

Here is the picnic basket.


The picnic basket is made using Stampin' Up! Scallop Envelope die. I have made one previously. You can see it here. Very easy to make and quite sturdy too.Sorry for the bad photo. Been very busy during the day and forgot to take the photo.Tomorrow the school starts (Yay!) and I will get some free time to catch up on craft. I will replace the photo tomorrow with one taken under sunlight. I have since replaced the photos with better ones taken under sunlight: )

Supplies:
Cardstock: SU's Perfect Plum
DSP: SU's Urban Garden
Stamp set: SU's Organic Outlines
Inks: SU's Orchid Opulence, Elegant Eggplant and Kiwi Kiss
Accessories: Kaisercraft's purple rhinestones, SU's scallope envelope die, Bigshot, SU's Elegant Eggplant ribbon and SU's oval punch.
 I just saw this card of mine under the honourable mention list of the previous challenge.You guys made my day :) Thanks a ton.
Great colors in this week's challenge. Love the combination.Thank you!
Hugs