Friday, February 19, 2016

More Taylored Expressions Projects

Hello everyone!

I have two watercoloured cards to share today. I made them using stamp sets from Taylored Expressions Feburary release. The first card features Wildflower Bouquet stamp set.


This bouquet is perfect for colouring. The sentiments are perfect for the image. Florals is a safe and versatile set to have in your collection. This set also has matching dies.


The first thing that came to my mind seeing the bouquet is watercolouring. So on my card below I heat embossed the bouquet and watercoloured the image using Zig Clean Brush watercolour pen.

Blessed to you friend card #1

I tossed between black or white  heat embossing initially. Then decided to white heat emboss because I wanted image to look softer and elegant. The paper I used is Tim Holtz distress watercolor paper on the smooth side. I then coloured the image using Zig Clean Brush watercolour pens. I dabbed a little color on the place I wanted the shadow  and then moved the colour using the aqua brush. This gives me a gradient of colour with highlights and shadows. I added grey on the outline of the image. This makes the image pop.

I then die cut the coloured panel using the second largest die from Stitched Rectangle Stacklets. I also die cut kraft cardstock using the largest die from the Stitched Rectangle Stacklets and layered under the coloured panel. I then wrapped around some natural twine and tied a bow. I adhered this layered panels on the white cardbase. The sentiment is also from Wildflower Bouquet stamp set, Finally embellished with sequins from Taylored Expressions Wedding collection.

Blessed to call you friend closeup

The second card is similarly watercoloured using Spring Tulips stamp set. This set also has coordinating die.


I white heat embossed the image on Tim Holtz distress watercolor paper and coloured using Zig Clean Brush pens. I did the exact same process of colouring as the previous card. Then I used the second largest die from Stitched Banner Stacklet to die cut a banner.

Tulips card

On a kraft card front, I stamped the tulip flower image using Kraft ink. I love tone on tone stamping. Then sponged the front edges with Frayed Burlap distress ink and brushed clear Wink of Stella shimmer on the tulip flowers. Then I adhered the die cut banner with watercoloured image on the top centre of the card front. Wrapped natural twine around the top of the card base and made a bow. The sentiment is from the Spring Tulip stamp set is stamped on a strip of white cardstock trimmed with fish tail banner. On this card I just added a single yellow sequins to the bow.

Tulips card closeup!

Both the stamp sets and dies along with many new stamp sets and dies released this February are available for purchase at Taylored Expressions Store.

Card Supplies:


Thanks for stopping by my blog today. Have a lovely weekend!
My blog signature

Thursday, February 18, 2016

Simon Says Stamp - Reason to Smile Release!

Good morning everyone,

I am so excited  about the new Reason To Smile collection from Simon Says Stamp. Did you check it out? LOVE the plush dies, the embossing powders and the felt. And Suzy's watercolour prints are awesome. Not to mention the stamp sets and coordinating dies. I want it all like yesterday :) Haha! That is not going to happen. However I do have one of the cutest background stamp from the collection. Yay! Thank you Heidi for sending me this cutest background stamp. I LOVE it  This background stamp is called Peeps! Today I am sharing an Easter card with you using this new background stamp.

Happy Easter card #1

I white heat embossed the background stamp on watercolour paper. You can see that I did not get an even coverage of the images. But I am not bothered by it because I like the texture it created on the watercolour paper. If I had stamped and heat embossed the background image on white cardstock, I want them to be perfect because I will sponge the background. The sponging will be even and therefore an evenly heat embossed background will be perfect. With watercolour background, I love the imperfections and texture.  Hope you are with me here :)

Happy Easter closeup #1


I coloured the background with distress inks, diluting it to get pastel colours. The panel is then die cut using the largest of the Stitched Rectangle Die. The "Happy" die cut is from Painted Happy Birthday die also from Simon Says Stamp. The "Easter"  sentiment  from Essential Greetings is silver heat embossed on a vellum strip and wrapped around the panel. I adhered this panel on Fog card base and embellished with Pretty Pink Posh 10mm, 6mm and 4mm Sparkly Clear sequins.

Hope you like my card using Peeps background stamp from Reason To Smile Collection. They are available for purchase at Simon Says Stamp Store.

Thanks for stopping by my blog today!

My blog signature

Wednesday, February 17, 2016

Simon Says Shake it Up!

Hi all and welcome to another week on the Simon Says Stamp Wednesday Challenge. Thank you for joining us for the  One Layer Challenge and we hope you will all join us again this week too

wed-newchallenge-header

This week the challenge is Shake it Up!

For this challenge we would like to see some shaker style creations, you can shake some ink sprays and give your projects a spritz or use an action wobble to make something shake! Whatever you decide to shake we will be looking forward to seeing it!
We are showcasing WE R MEMORY KEEPERS PRODUCTS this week. You don’t have to use them to join in with the challenge, but if you have them we would love to see them used!

As always Simon Says Stamp will be giving away $50 voucher to shop at the fabulous Simon Says Stamp Store
50dollar_voucher_600px
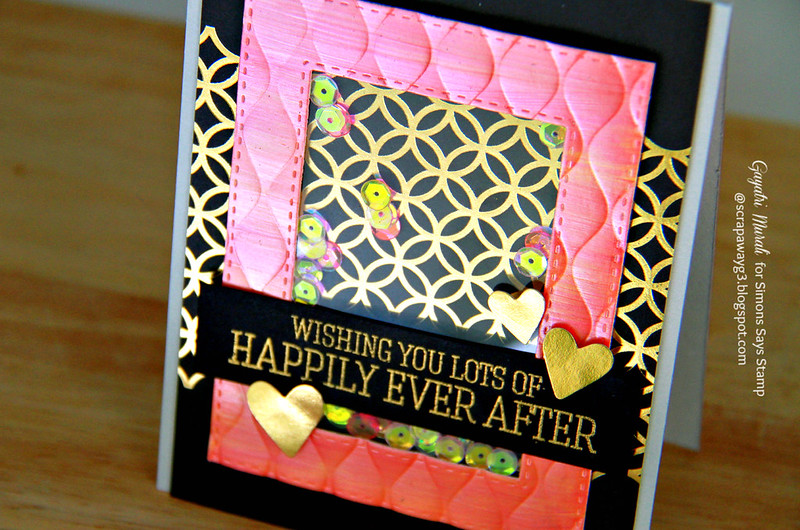
I LOVE shaker cards. So I made one for this challenge :)

Happily ever after card #2

As you can see I have used We R Memory Keepers's Next Level embossing folder on my card here. The frame is made by frist applying Cantaloupe and Flamingo Liquid Pearls on white cardstock. When dry I used two Simon Says Stamp Stitched Rectangle die to die cut a thick frame. Then I ran this frame through cuttlebug using Wave Next Level embossing folder. I adhered acetate sheet on the back of the frame. 
On a fog card base, I adhered the pattern paper from My Mind's Eye Fancy That collection. These papers came in Simon Says Stamp May 2015 card kit. I love the intricate gold foiled design against the black. Very classic! I added some iridescent sequins from Pretty Pink Posh on the card front. The sequins I used are Ballerina Sunshine Glow and Strawberry Burst iridescent sequins. Then adhered the frame on the centre of the card front using foam adhesives to make a shaker box. I really love how elegant the frame is on the card front.

Happily ever after closeup1

The sentiment is from Congratulations stamp set also from Simon Says Stamp. This set came with Simon Says Stamp May 2015 card kit and is also available to buy on its own. I gold embossed the sentiment on black cardstock strip and adhered the strip over the frame using foam adhesives. Finally added some gold foil heat sticker from My Mind's Eye Fancy That collection. I absolutely love the colours and contrast on this card.  Classic and elegant at the same time.

So now it's YOUR turn, Happy Crafting

Instagram

If you use instagram add  #ssswchallenge to your challenge entry uploads so we can see them on there too!


You have until Wed  8am Ohio time. 1pm UK time, 2 pm CET to join in
No backlinking allowed, Only 5 new creations will be eligible in the prize draw

word-verif

Card Supplies:


Thanks for stopping by my blog today!

My blog signature

Tuesday, February 16, 2016

Thanks card!


Hi all, Yesterday I received some new goodies from Simon Says Stamp. In the package was We r Memory Keepers Next Level embossing folder. I have been waiting to get this for a long long time. I just love the dimension the Next Level folder gives. So beautiful. This one I have used is called Wave. There are two folders in this set. To make the dimension stand out, I wanted a pearly background. The light reflected off the sheen gives shadows and highlights making the dimension look detailed and wonderful. Here is the card first.

Thanks card

In my pack of new goodies, I also bought some Ranger Liquid Pearls. Virginia Lu's Christmas card she sent me had these beautiful liquid pearls embellishments. So I bought a few colours. Instead of using as pearls, I decided to cover my entire background using them. I chose a teal and bright green  called Juniper and Key Lime. I brushed them on a white cardstock using a broad brush keeping the strokes long and even. I left it to dry. Didn't take very long to dry as my day is another 40C day. I then ran this panel on the cuttlebug using the largest stitched rectangle die from Stitched Rectangle Die set from Simon Says Stamp. Then again ran this panel through the cuttlebug using the Wave Next Level embossing folder. WOW! the panel is so beautiful as you can see. You can see the shadows and highlights on the dimension because of the sheen texture and colour on the panel.

Thanks closeup card #1

For the focal point, I did exactly the same process using Cantaloupe and Flamingo liquid pearl and die cut using Scribble Hearts die from Simon Says Stamp. Love the sheen using the liquid pearls. I layered this on the panel. Sentiment is Painted Thanks die from Simon Says Stamp which I die cut using black cardstock. Finally embellished with Clear Droplets from Pretty Pink Posh. This panel is mounted on Fog card base.

Card Supplies:


Thanks for stopping by my blog today!

My blog signature