Friday, January 31, 2014

Playing along.....


Here is the inspirational picture of the challenge.


I love that grey colour on the wall. Then the red colour from the pram, the flight of butterflies and sun ray from the pattern paper on the wall caught my eye. So keep the these as my inspiration I made my card.

Celebrate! It's a girl card

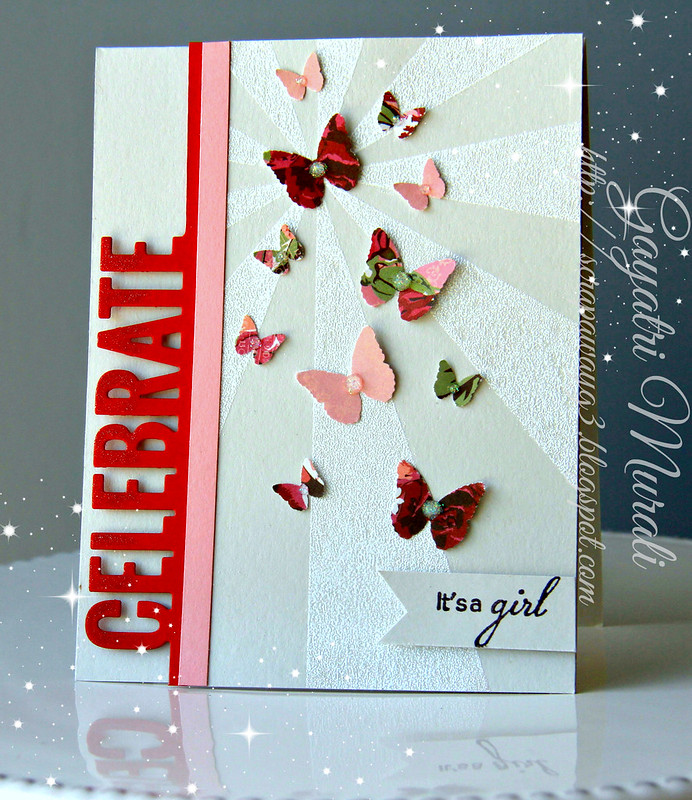
I love love the Grout Grey cardstock from MFT. Beautiful neutral colour I love other than white. And white embossing the sun rays stamp from Hero Arts gives that subtle texture. Love it. I then diecut the "CELEBRATE" die using red cardstock, added a pink strip. After a long time I punched out butteflies using the MS butterfly punch. They are punch out of pattern paper from Kaisercraft. Colours matched perfectly :)
I then added some Diamond Glitter Stickles on the centre of the butterflies. Finally used wik of Stella shimmer pen on the top portion of the die cut word. I hope you can see the shimmer in the photo below.

Celebrate! It's a girl card closeup

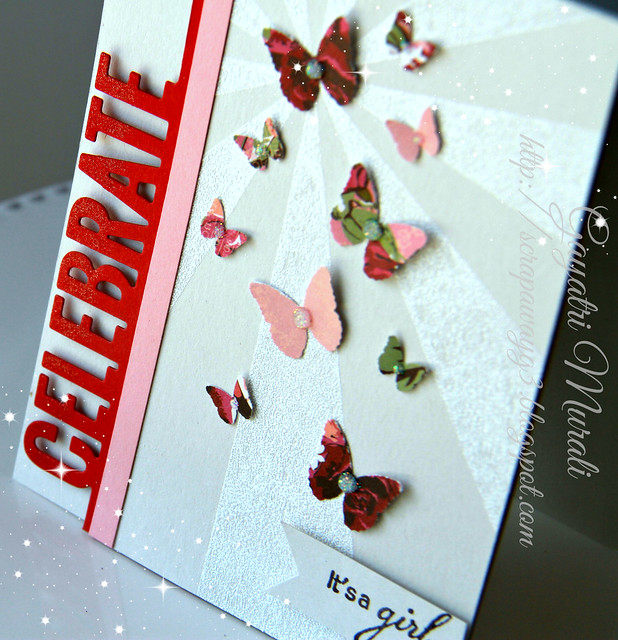
I love the colours on this card. Very happy with how my card turned out.

Thanks for stopping by!

Blog-Siggy-in-gold

Thursday, January 30, 2014

Happy Bee-lated Birthday!


Second post for today. Here is the first post.

I am still in the mood to play with stencils. So I used Heidi Swapp's Honeycomb stencil and sponged Mustard Seed distress ink diagonally. Here is the card.

Happy Bee-lated Birthday card

The stamp set I used was from The Craft's Meow called Thanks Bee to the Thee. Perfect on the honeycomb sponged on the card panel. I then added some shimmer using Wink of Stella on the wings of the bees. Easy and quick to make. I have used the new sketch from CAS(E) this Sketch #62


Come and play along this new sketch at CAS(E) this Sketch Challenge Blog. For more inspiration from design team and the gorgeous guest design team member Amy, go to CAS(E) this Sketch Blog.

Thanks for stopping by!
Blog-Siggy-in-gold

Case Study Challenge #176

Hiya!

Yesterday was a super busy day. With school starting Monday getting prepared with books, covering, labelling, getting new uniforms.... the day flew by very very quickly. I just cannot wait for Monday :) Get back into routine. I need MY time.
Today being a bit relaxed, I had time to play CASE Study Challenge #176
This is Donna's muse card.

What a pretty card? Love that big bold bright flower on the background. 
I decided to use Uniko Studio's Pure Floral - Chrysanthemum stamp set for my card. It has two gorgeous BIG Chrysanthemum flowers in it. One solid flower and other outline flower. 
Here is my card for the challenge.

Congratulation card

I decided to colour my flower. So I used watercolour paper and stamped the big outline flower using Picked Raspberry Distress Ink. Then I coloured the flower using the same colour distress ink. I coloured in layers to add shading as well as extending the some watercolour outside the flowers by drying with heat gun in between layers. For the sentiment, I stamped the big sentiment from All Occasion Sentiment  #1 using gold ink and heat embossed with Zing gold glitter embossing powder on vellum. Wrapped the vellum around the watercolour paper and glued the paper on the card front. Finally added some gorgeous gold star from Pretty Pink Posh to accent. Here is the close up of the gorgeous gold glitter sentiment. I am learning how to use my camera by reading the manual. Shocking! I am reading the manual!!! If you click on the photo and enlarge it, you can see how sharp the sentiment is. I am so proud of myself :)

Congratulation card

Thanks for stopping by!

I have a great news to share later next week. I am enjoying creating using their new goodies. Cannot wait to scream out. ;)

Blog-Siggy-in-gold

Tuesday, January 28, 2014

Final Day Stencil Class Card - Congrats


I am sad that the Stenciled class finished :-( I enjoyed this class so much and although I knew few techniques, I liked watching videos of how it is being done. I am a visual person and videos help a lot.  And this makes me try them out. Once I actually make a card using the technique, the techniques stays with me like forever. Thank you so much to all the fantastic teachers. Great work with the class. 

The final day videos are awesome. I wanted to see the bird card from the time I saw it on the sneak peeks. Julie, I LOVE that card, the colours and texture of the embossed card is just fantastic. I came back from the gym and first thing I did was to get working on embossing with stencil technique. So here is my card.

Congrats card

Luckily I have the Mini echoes stencil and I went ahead and embossed it on the white cardstock. After sponging, I wanted to add some texture. So I spattered some plain water. That cute bird from Hero Arts is out of stock for a long time from SSS. I finally gave up and made my order. Anyway, I have this gorgeous bird from The Craft's Meow stamp set called Happy as a Lark. Perfect to stamp and finish off the card. Love how my card turned out. Pretty much similar to Julie's card except the colours, sentiment and bird.

Well I cooked my cuttlebug plates in my oven yesterday. I didn't want to throw out my well loved warped plates. I wanted to try and flatten them. So I covered them in foil, put on baking tray with heavy pyrex containers on top of the plates. I cooked it for 30 minutes at 150 fan forced. When they came out, it was FLAT! and all the papers stuck between the cuts all fell off. I am so impressed. Now I have couple more plates to use :) This is not my idea. I read it from Pinterest. what will I do without Pinterest lol!

Thanks for stopping by!

Blog-Siggy-in-gold

Monday, January 27, 2014

Hugs & Kisses!


Second post for today! Here is my first post.
Sharing another card I made using stencils and embossing paste. I loved Debby Hughes video and more so the layout of her cards. So I tried the off-center cluster layout.

Hugs & Kisses

I don't own many stencils so I used MFT's Damask stencil once again on my card. I first sprayed Seafoam Mr. Huey then clear shine spattered on the card front before I used the gold embossing paste on the damask stencil. I masked off all the damask except one. This makes it easier to apply the paste into the desired area. While the paste dried, I die cut couple flourishes and a small doilie die all from MFT. Also white heat embossed the sentiment on the black card stock and trimmed it. I am impatient, so I went ahead and dried the paste using the heat gun. Then I glued in the flourishes and doilie then foam mounted the sentiment strip. Finally accented with enamel dots and sequins. I was not sure about the card then. But when I photographed it and saw it on the laptop screen, I liked it :)

Hugs & Kisses closeup!

Such a cool layout and love the texture of the gold damask.

Now I am going to cook my cuttlebug plate to remove the marks and make it flat.
 Fingers crossed it turns out good.

Thanks for stopping by!
Blog-Siggy-in-gold

Getting Sketchy...


Print

with MFT's new sketch for this week- MFTWSC160
MFTWSC160

Here is my take on the sketch

Pictured together card

I have used On the Diagonal Stencil with translucent modelling paste which I mixed with a few drops of Sour Apple refill ink. Love the beautiful pastel mint colour and texture using the stencil. Once dry I trimmed into the inner panel. I diecut the large Precious Polaroid and Centrepieces Framed Lovebirds using Steel grey cardstock to make my polaroid. The sentiment from Picture This Stamp Set which is white heat embossed on vellum. Just love the texture of the embossing paste, heat embossing on vellum and the colours. Pretty happy with the result.

I am loving the Stenciled class and experimenting various techniques using stencils. If you are interested, here is the link to the class - Stenciled
Blog-Siggy-in-gold

Sunday, January 26, 2014

You are not old! You are vintage!


You are not old only vintage card

For the background I have watercoloured using stencil from My Favorite Things. I have graduated from red to orange to yellow. It is easy to blend the colours using watercolour. I love the not so perfect background. I used watercolour paper to do the colouring. Then I die cut the typewriter die also from MFT and stamped the image in black. Made a slit to inset the paper. For the paper, I sponged Antique Linen distress ink, sponged Aged Mahogany distress ink on Cup stain stencil from TCW and stamped the sentiment. I mounted the typewriter on the watercoloured stencil background panel with some bunched up thread on the background. I love this sentiment -" You are not old! You are vintage! ". I think it is cheeky and perfect for grandpas and older men. 

This is the third post for today. Here is my first and second post, if you like to have a look at them :) I am having a great time crafting and blogging today. Perfect day according to me. One more week of school holidays and then back to school, Hooray! Love to get back into the routine. 

Thanks for stopping by!

Blog-Siggy-in-gold

Stenciled Class Day #1 - Card #2


Second post for today using inks and sponging technique using stencils.
 Here is the first post.

Birthday card

I love the tone on tone as card background. So I sponged MFT damask stencil using black ink on grey cardstock. I then trimmed the panel and adhered to the card front using foam adhesives. For the second panel, I used the same MFT damask stencil with versamark and heat embossing. Then brushed some gesso around the heat embossed damask. Once dry I sponged distress inks. Trimmed the panel and mounted using foam adhesives. The sentiment is from Hero Arts mounted using foam again with a bunch of thread under it. Love it! Enjoying the stenciled class. Off to see what is in store for the second day.

Blog-Siggy-in-gold

Stenciled Class Day #1


Good morning! Yesterday was so busy that although I made cards, I could not share. So here I am sharing two card made using sponging with stencils technique. I am in need of baby cards because I have five friends who are ready to pop out their little bundle of joy anytime now. I utilized this chance to create baby cards. Here they are.

Girl Baby card

I used Heidi Swapp Confetti stencils on y card. I sponged Worn Lipstick distress ink on diagonal ends of the panel. Then added some shimmer using the Wink of Stella and also some Diamond Stickles randomly. The tag dies and the stamps are from Wplus9 called Baby Onesies.
Here is the boy version of the same card.

Boy Baby Card!

The inks sponged here are Soft Pool and Mint Julep from Hero Arts. No shimmer on the stars but I have randomly added Diamond Stickles.
I love the pastel colours and the confetti stars on the background. The vellum tag softens the entire card. I am happy with how both the cards turned out. Today is a relaxing day. So hopping to get more done today :)

Thanks for stopping by!
Blog-Siggy-in-gold

Saturday, January 25, 2014

Runaway Inspired Challenge #52


A quick post today. Sharing a card I made for Runaway Inspired Challenge #52


I am inspired by the brush strokes on the dress with the subtle blue and the bright red lipstick. So here is my take on the challenge.

Happy Birthday Card

I have gone for the freestyle layered scrapbook layout on my card. For the brush strokes, instead of the brush strokes, I opted for flowers from Avery Elle Petals and Stems stamp set and stamped with gelatos to give the watercolour look. I trimmed a panel of it and layered with vellum, watercoloured blue and pink pattern paper. I used the bright red happy birthday diecut to add sentiment. I have spatted some blue Mr. Huey on the card front before I adhered the layers. Finally added a bow and accented with enamel dots.
Here is a close up!

Happy Birthday closeup!

Thanks for stopping by!

Catch you later.

Blog-Siggy-in-gold

Friday, January 24, 2014

The Cure for Monday Blues Challenge #1


Playing along Taheerah's new challenge called The Cure for Monday Blues Challenge #1
Here is the photo inspiration of the challenge.


What inspired me of this photo is the watercoloured paper, the hand lettering sentiment and pink, yellow and orange neon colours. So here is my take.

Best wishes card

I have used the neon Mr Hueys from Studio Calico on my round acrylic block to get the watercolour background on the tag. The sentiment is stamped, trimmed and glued. The black and white tag is a pattern paper from Printshop Collection from Studio Calico. For the card front background I have used gelatos and coloured to get the watercolour layers. Finally accented with silver stars.

Best Wishes closeup!

Love the neon colours with the black lettering. What a contrast. And the watercolour background soften the contrast and brings everything together.

Thanks for stopping by!

Blog-Siggy-in-gold

Thursday, January 23, 2014

CAS(E) this Sketch #61

Congratulations

Hey everybody,

One day with out a post and I feel as though it has been a long time. I am crafting and making cards but cannot share them yet. They are made of gorgeous new products. You will love them.

Anyway, here is our new sketch from CAS(E) this Sketch Challenge Blog.
This sketch is by Julie Day.


Here is my take on the sketch.

Congratulations closeup!

The background is pattern paper from Studio Calico. With the panel, I brushed the cardstock with gesso lightly not covering the entire cardstock. Then I sponged distress inks, Mowed Lawn, Salty Ocean and Picked Raspberry. The result is amazing! I then die cut those flowers in black cardstock and layered them. I coloured the edges of the layered die cut with Tea Dye distress marker and went over with a wet brush to blend the colour. Finally added heavy shimmer on the die cuts. This gave a gorgeous aged metal look against the beautiful bright background. The sentiment is from Hey There stamp set from Studio Calico.

Check out CAS(E) this Sketch Blog for more design team inspiration using this sketch.
Come and play along this new sketch.

Blog-Siggy-in-gold

Tuesday, January 21, 2014

There is still time to play


I played along and made another card using Denami Designs Stamps.

With all my heart

I used gelatos to create my background. There is a shimmer on the background using the metallic gelatos. Then I stamped three Denami Outline Stamp using a very soft pink ink. Cut them out. Applied glue and added gold glitter. I then added the thread to each heart and foam mounted them. I then added bows to each of them. The sentiment also from Denami Designs is stamped in black. I then mounted this panel on to card base using foam adhesives.

Come and play along this challenge and you enter a chance to win $20 Denami Gift Certificate.

This is my second post for today. Here is my first post.

Thanks for stopping by!

Blog-Siggy-in-gold

HB2U - Masculine Birthday Card!


Good Morinng!

I made a masculine birthday card using this sketch.

MFTWSC159


And here is my take on the sketch.

HB2U

I love teal and orange colours together. I think these colours are great for masculine cards. I love bright colours even for teens and young adults. Paired with white they look gorgeous. So after I picked the colours, I have used dies from Die-namics Blueprint #9, Rock and Roll and Blueprints #5 to make my card. I have sponged red distress inks on all the orange die cuts to add some shading. The sentiments are from Rock On and Gift Card Greetings II. This is a very classic layered card. The background is stamped using Western Backgrounds stamp set. Love the colours and the card. Hope you do.

Blog-Siggy-in-gold

Monday, January 20, 2014

To the Bride and Groom!


Sharing with you a wedding card I made. I have an order for a few cards including cards for wedding and anniversary. I haven't done wedding cards in a long time. I am trying to design some thing elegant.

To the bride and groom

I love gold on white. So I stamped Hero Arts Large Flower background in gold on the card front. Sponged some antique linen distress ink around the edge.  I then die cut Written on Ribbon die from Wplus9, stamped the ribbon image in gold again. Then choose sentiments from Fresh Cut Wreaths and Written On Ribbon stamp sets from Wplus9 to stamp on the ribbon die cut. I simply mounted this ribbon diecut using foam adhesives. Glued some stars randomly and added a mint coloured heart enamel dot to finish off the card.

To the Bride and Groom

I love it. Looks festive and elegant. Making this card has given me some confidence to create a few more wedding and anniversary cards. And I will then share them with you.

Thanks for stopping by!
Blog-Siggy-in-gold

Sunday, January 19, 2014

Black, White and Gold - A classic combination!


Good morning! I have been inspired by a few pictures I found on Pinterest. I straight away pinned them. Since Gold is the flavour of the month for me. lol! I am inspired by the gold calligraphy writings on black balloons. And also use of gold glitter on the balloons.  The contrast is eye-catching. You can find all the inspirational pictures pinned to my GOLD Pinterest board. With these in mind, I set out to make a card yesterday. Here is the finished card.

Love your still card

 For the background, I used Hero Arts Large Flower background stamp inked in gold ink stamped on white cardstock. So elegant. Love it as it is. The balloons are die cuts using My Favorite Things Balloon Die -namics. I love the calligraphic font sentiment on the Valentine Wishes stamp set which I stamped in gold on a black balloon and heat embossed using Zing Gold Glitter embossing powder. Then on the rest of the balloons, I used spatter stamp from Jumbo Abstract Art stamp set from My Favorite Things to stamp in gold and heat emboss using Zing Gold Glitter embossing powder. The balloons looked gorgeous in contrasting colours and glitter. 

love you still card

I added black twine on the back of the balloons and clustered them as a bunch, then adhered on the card panel. Sprinkled some black stars. Finally added the little banner from Valentine Wishes die with sentiment stamped in gold.


Simon Says Stamp Wednesday Challenge Blog

So I am entering this card for the challenge. I really love the outcome of this card. Hope you do too.

Thanks for stopping by!

Blog-Siggy-in-gold