Showing posts with label i {heart} papers. Show all posts

Sunday, June 29, 2014

Last card as guest designer for i {heart} papers

Hey everybody,

Sharing my last card as Guest designer for i {heart} papers. It has been amazing journey guest designing for last two months. Thank you so much Tracy and Kate for giving me the opportunity.


Here is my card for you.
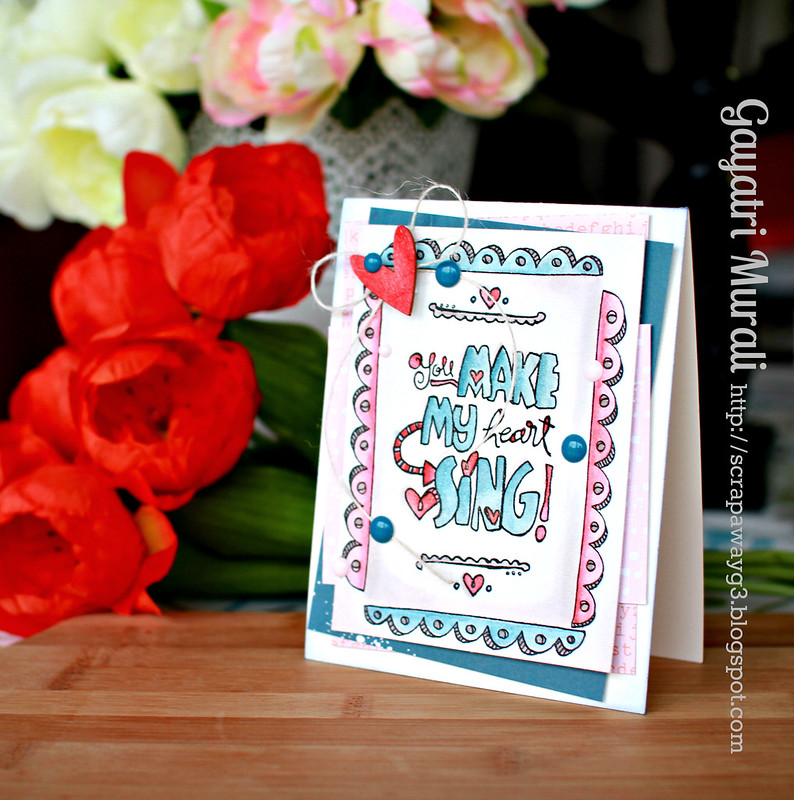
You make my heart sing  card

I have done some layering on my card. Not layering the stamps but layering pattern papers. Something I normally not do. Gone are the day when I layered pattern papers on my scrapbook pages. Yes, I was a scrapbooker and my style was layering papers and embellishments. From that to now making clean and simple cards - what a change? Anyway I have used Love it stamp set from My Favorite Things which I stamped and coloured using Distress markers. I have used coordinated border stamp set to stamp the borders and coloured them as well. I trimmed this watercolour paper and layered with pattern papers from Chickanniddy Crafts Date Night and Twirly Girly 6 x 6 paper pad. I then made a bow using jute thread which I adhered using glossy accent. I then layered the bow with a wood veneer heart shape which I have inked with red ink. Finally accented with some enamel dots. I let the sentiment be the focal point and accented the colours using pattern papers and embellishment.

You can find all the products I have used  at i {heart} papers.

Date Night 6x6 pad Twirly Girly 6x6 pad Ultra Smooth Premium White Cardstock - 20 sheets

  Tim Holtz Distress Markers *2013 NEW COLORS* - set of 12 Love It


I have more news for you. i{heart} papers is having a moving sale right now. Yay!
You get 30% off on your order. Here is the code for you - moving2014.


Quick! Get in your order before products sell out. Happy Shopping!


My blog signature

Friday, June 20, 2014

FAB - O!

Good Morning!

I have a card share for you today using a lot of stencils work and sponging and very less of stamping.
This is my third card as Guest Designer for i {heart} papers this month.


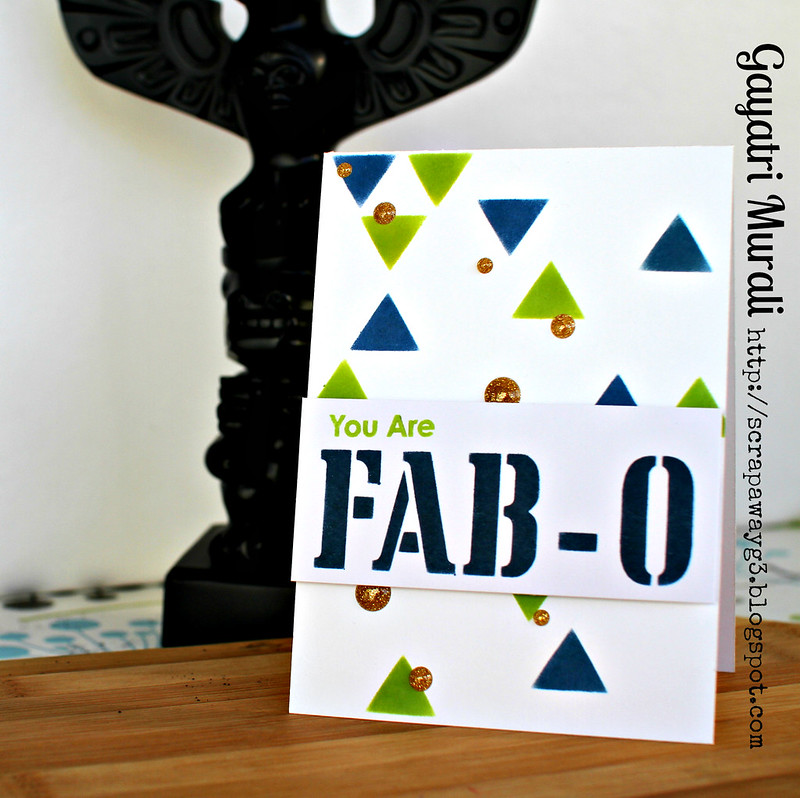
This is a clean and simple card where the colours makes an impact. Here is the card for you.

You are FAB_O card

I am recently drawn towards Green and Navy colour combination with a bit of gold. In my opinion this combination is more mature and masculine in nature. Don't ask me why I feel it a mature combination - just a vibe lol!
Anyway, I have used Heidi Swapp 3 x 4 Mini Stencils Patterns and Words to make this card. There are gorgeous patterns in the stencil pack and I was drawn to the triangle pattern. I sponged green and navy dye inks using sponge dauber randomly on to the triangles, moved the stencil and repeated the same until I was satisfied with the coverage of the triangles on the card front. I then sponged the FAB - O word on a strip of white card stock using navy ink. I have used Simon Says Stamp Green Apple and Soft Navy inks here but you can pretty much use any dye inks. i {heart] papers have plenty of dye inks from Hero Arts which will work perfectly. Now the only stamping I did was the ' You are' which is from MFT. Finally accented with the gorgeous sparkly gold enamel dots from Charmed collection from My Mind's Eye. I really love how simple the card is to make and what a big impact the colour makes. I love these mini stencils from Heidi Swapp.

Here are the products I have used on my card. You can find them all at i {heart} papers shop.

3x4 Mini Stencils - Patterns 3x4 Mini Stencils - Words

Ultra Smooth Premium White Cardstock - 20 sheets Record It Enamel Dots - Charmed


I have more news for you. i{heart} papers is having a moving sale right now. Yay!
You get 30% off on your order. Here is the code for you - moving2014.


Quick! Get in your order before products sell out. Happy Shopping!

My blog signature

Wednesday, June 11, 2014

A purple birthday card...


Hello dear craft friends, 

Sharing with you a very birthday card I have made as Guest Designer for i {heart} papers.


Here is the card.


Happy Birthday!

For the background on the card, I sponged some distress inks and spattered some water. Any dye inks will do this trick for you as dye inks do react with water.  I also did the same another piece of cardstock. On this cardstock, I white heat embossed the feathers from Dream stamp set from Lawn Fawn and the banner from Bannerific stamp set also from Lawn Fawn. I die cut the feather using the coordinating Dream dies. And hand cut the banner. I stamped the sentiment from Happy Everything stamp set from Lawn Fawn. On the feather I added some black dots using a black fineliner. I trimmed the sponged cardstock, adhere to the card front. Then mounted the banner using foam adhesives and glued the feather down at its bottom so the top of the feather is raised. Finally accented with white enamel dots from My Mind's Eye Charmed collection.
I love the magical and monochromatic colours. Hope you like my card.
You can find all the products I have used at i {heart} papers shop.

Thanks for stopping by!

My blog signature

Wednesday, June 4, 2014

Second month guest designing for i {heart} papers


Hey everybody,

This is the second month I am guest designing for i {heart} papers. 


Today I have a birthday card for you.

Happy Birthday card 2

I have trimmed the golden striped pattern paper from My Mind's Eye Charmed collection 6 x 6 pattern paper pad to the size of the card front and adhered on to the card front. I then die cut the large Polaroid frame from the Polaroid dies from My Favorite Things using black card stock. For the background, I simply painted some Evergreen Bough distress ink on some scrap cardstock and when dry adhered it to the back of the polaroid frame. I then die cut the large oval balloon from the Party Balloon Die also from My Favorite Things. I heat embossed some gold Zing embossing powder on the balloon randomly, tied the black and white baker's twine to it and adhered using foam adhesive. The sentiment is from Celebrate Big stamp set also from My Favorite Things. I have mounted this using foam adhesive as well. I finally embellished with sequins from Lawn Fawn Hello Sunshine mix.
It is a simple card but the gold, black and mint colour combination creates a big impact. You can find all the products I have used on my project from i {heart} papers shop.

Polaroids die  Record It! Charmed 6x6 pad  Party Balloons die

Bakers Twine - Cotton Mini Spools  Celebrate Big  Lawn Ornaments Hello Sunshine Mixed Sequins


Hope I have inspired you to make a birthday card. Thanks so much for stopping by!

My blog signature

Sunday, May 25, 2014

Happy happy happy birthday wishes


Hello my dear craft friends! Welcome back to my blog.


 I am sharing a card today for i {heart} paper as guest designer.


Happy Birthday Wishes card

For this card, I have used the Happy Trio die from Wplus9 and die cut Happy in various colours. I have glued them on the card front.  Love the impact the big, bold and colourful Happys make on the card front. I have brushed the happys with Wink of Stella clear pen to give some shimmer. I have layered the pink happy over the black happy slightly offsetting to give shadow. I will be using this "happy" as my main sentiment and add to it the smaller stamped sentiment. The stamped sentiment is from Whole Lotta Happy also from Wplus9. I decided to do the inside of the card as well

From all of us inside

I die cut some balloon from the Whole Lotta Die which coordinates with Whole Lotta Happy Stamp set. I stamped the balloon with the heart confetti shapes from Borders and backgrounds #3 stamp set. I also stamped a rainbow of the heart confetti border on the bottom of the card inside. Then finally stamped the sentiment "from all of us" form Whole Lotta Happy stamp set. This completed the card. Hope you like it.

You can find all the products I have used in this card from i {heart} papers shop. Here is the list of products for you.

Whole Lotta Happy Happy Trio Die

Borders and Backgrounds 3 Wink of Stella Brush Glitter Marker


Thanks for stopping by!
My blog signature

Friday, May 16, 2014

Feel Better Soon


Sharing my third card as guest designer for i {heart} papers.


i {heart} papers


While I am in a mood for watercolouring, I made a card with watercoloured background and silhouette images. Here is my card.

Feel Better Soon

I have used watercolour paper and used distress inks to watercolour background. I did wet on wet technique which is basically sprayed my watercolour paper with water first then added Distress inks using watercolour brush and let them blend. I have used  Seedless Preserve, Picked Raspberry, Worn Lipstick and Festive Berries distress inks. You can use Distress Markers to do the same as well. After the first layer dries a little, I brushed these inks again using wet brush to get some layers. Once dry, I trimmed the watercolour paper. I then stamped the images from Botanicals 2 stamp set from Paper Smooches using black Memento ink. I also stamped the sentiment from Healthy Vibes stamp set also from Paper Smooches.  I then realised that something is not quite right if I place the watercolour panel on the card front. So I trimmed a 1/4" off and mounted using foam adhesives to the card front. I then added a black polka dot pattern paper from Kraft in Color - Color 6 x 6 paper pad. Finally added some white enamel dots to finish off my card.

I really love the layered watercolour with silhouette images. Here are the products I have used on my card. You can get them all at i {heart} paper shop. Click on the images to take you to the shop.

Kraft In Color - Color 6x6 paper pad      Botanicals 2          Healthy Vibes (Kismet collection) 
Memento Ink PadsTim Holtz Distress Markers *2013 NEW COLORS* - set of 12 Necessities Adhesive Dots - Black and Gray 


 Have a great day!

My blog signature

Saturday, May 10, 2014

Mother's Day Card - Guest Designing for i {heart} papers

Hello everybody,

I am sharing with you a card with you as Guest Designer for i {heart} papers.

i {heart} papers

Since tomorrow is Mother's Day for us in Australia, I decided to make a card for my mum who is with me this Mother's Day. Here is my card

For you Mum card

I have used The beautiful Bloomin' Aussie Florals stamp set from Flourishes to stamped my flower cluster using the Memento Black Ink and coloured using Copic makers.  I then cut out the flower cluster.
for the card base I have used white card stock. I covered the card front with pattern paper from Twirly Girl 6 x 6 pad from Chickaniddy Crafts. Then I trimmed a white cardstock at an angle, stamped the image from Bloomin' Aussie Florals stamp set using Memento Luxe Ink - Dandelion. I also stamped the sentiment using Memento Black ink. I then mounted this angled panel on the card front. Finally glued the cut out flower cluster towards the bottom left. To add some shimmer I have used Wink of Stella shimmer pen on the copic coloured flower cluster image. My mother likes flowers and shimmer. This card is perfect for her. 

You can find all the products I have used to make this card at i {heart} papers shop. Here they are for you.

Bloomin' Aussie Florals Ultra Smooth Premium White Cardstock - 20 sheets

Wink of Stella Brush Glitter Marker Memento Ink Pads

Twirly Girly 6x6 pad


Hope I have inspired you to make a quick Mother's Day Card. 
Thanks for stopping by!


My blog signature